Categories
craft things to do

Project Height Chart

well i’m well on my way to finishing 33 blog posts by the time i turn 33…ok not so much, i’m going to have to step up my game…

2/33

so i really don’t like wasting and that goes for a lot of things, food, money, stuff…i also don’t want to ever have hoarder status though so if i can’t upcycle something, pass it along, or sell it, i donate it. of course i always try to figure out if there is something i can do with an item before just getting rid of it because i would hate to have to buy something else in the future and kick myself because i could have just used x.

of course this drives the husband crazy because he wants to get rid of stuff faster than a zit on your nose. i am learning though and along with not being wasteful i do want to keep life simple as well and sometimes that means getting rid of stuff. more on that in the next post!

anyway, here’s an upcycle that i did in about an hour! simple, cheap and awesome!

i had this sign that we used to use when we would go to bridal bazaars. it wasn’t cheap but we used it for years and got our money’s worth out of it. then we changed our business name and just like that this sign became garbage.

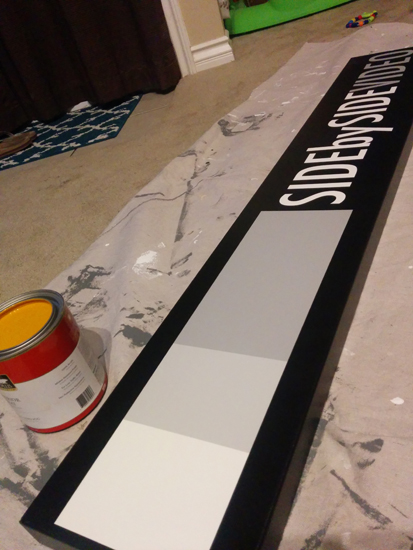
it sat around in the closet for a few years and jared said i had to get rid of it. so thanks to pinterest and having a child, i finally thought of what i should do with this cumbersome item!

yellow/goldenrod is one of my favorite upcycle colors right now! we actually blew through a whole can with projects so i did need to buy a new can for this, but i’m sure i’ll use it all eventually 🙂

i have terrible handwriting so i used my dad’s stencils to paint the numbers and…

voila! done. just like that. i did this whole project after the baby went down for the night and hung it up in the play room. i used it on her first birthday and we’ll have this for years! from garbage to a keepsake!

do you have anything you’ve wanted to do something with but can’t think of an idea?

Categories
craft nest things to do

Project Play Room


one of the more unique features of this house we bought was a small room we like to call the bonus room. it’s too small for a bedroom, but has a teeny tiny closet like maybe it was meant to be one. but then there were these sliding glass doors which would not be ideal for a room. when we first bought the house, we used the room for the piano and books and very few people used the room. we maybe only used the sliding glass door once because as you can see, we already have one in the living room which made that one totally unnecessary. we long ago decided we’d use the ‘bonus room’ as a play room when we had kids, and so we finally finished this project!!!

here’s the view from the living room to the giant hole after the doors were removed.

we are huge proponents of hiring professionals to do things right. we hired professionals to do our backyard a couple of years ago because we knew we can only do so much diy. so getting the door out, a window put in and walling everything back up we hired out. everything else we did ourselves 🙂

my painter man!

starting in on my magnetic chalkboard wall!

my dad helped me frame it up.

and here’s the finished (ish) product! i have a new picture going in the middle and i’m sure i’ll make some minor adjustments as time goes on, but overall, this is what we were going for!

teepee made by little braves

shelf and rug from ikea (shelf bought used, rug eventually returned because it was super cheap and bunched up and made the baby trip)

pouf from target (totally recommend!!! we love that thing)

curtains made by me and fabric from joann’s 

Categories
craft nest things to do

project nursery

well, baby kate is here! we welcomed her into the world on saturday and we are thrilled! she is so cute and parenthood is just as amazing and exhausting as everyone says. i’m so glad it finally happened for us and we pray for our friends who want the same thing to be blessed with their very own babies.

we had a really fun time working on her nursery over the months before she came. i really didn’t want to spend a whole lot of money on the nursery and wanted to make it as personal as possible. we also didn’t want to make it too girly since we were sure she’d get plenty of girly clothes!!

so we started with my old furniture from growing up! this antique dresser, the bureau that matches my old crib and a toy box my dad made me!

ditched the old knobs

used gray and white chalk paint since  we didn’t know the gender before we started and figured these were great colors to go with either!

yep, painted indoors…

then my friend dez and i worked on putting everything together! she is so good at design, check out their personal blog to see their fun projects!!

we used a bunch of scrap fabric i had lying around

and here’s the final product!!

items for decoration from here and there. found the bunny bookends at a flea market but they were too expensive for my taste, but jared surprised me for mother’s day with them 🙂 good husband!

lamp from ikea

new knobs from world market

found the rocker/glider for $40 and then had someone recover it for me. much better than buying a brand new one with an ugly cover! and i sewed the pillows…something i can do with sewing!

mobile made by my talented dad

dad also made the valence and then we covered it

the blanket was from ikea which gave us the idea for the woodland animal theme.

dez and i spent some time on this wall and she finished the kate sign for me!

found this cute greeting card at trader joe’s and put it to good use since it worked with the theme!

my dad drew this tree and people put their prints and signed it at my showers. we have it hanging over the changing table and i get to be reminded of all the people who love little kate every time i change her.

rug made by my talented friend timmery.

these cute knobs also from world market

the whole thing!

and now all my old things are hers for a new generation 🙂

Categories
craft nest things to do

project crib repurpose

 so with decorating our baby room, i’ve been obsessed with doing as much DIY as possible, and decorating with random finds. it’s been really fun putting it all together and i’ll have a post dedicated to the room soon! but for now, just a post on my old crib 🙂

my parents saved my old crib all these years thinking it would be fun for me to use it for my kids someday. of course they never knew that there would be laws about drop-side cribs and all that so they took it out of the rafters and asked me what we should do with it. i quickly ‘pinterested’ and saw some fun ideas of what you can do with old cribs.

here are my brother and i looking super weird in the crib, crazy kis!

and hopefully my mom doesn’t kill me for putting a belly pic up but that’s me in there, so fun!!

this brings me to my dad. his love language towards others is acts of service. all you have to do is talk about a fun project and before you know it, he’s out in the garage helping you bring your idea reality. it helps that he is super creative and talented. all i did was show him a picture and he went right to work on taking apart the old crib.

my mom took some behind the scenes pics for me 🙂

so he made a cool bench out of the crib, and the other color wood was a piece of wood leftover from when we got some new shelves, he’s so resourceful!!

then it came to me and i painted it to match the other furniture in the nursery. i did chalk paint, sanded it after, and waxed it.

and to finish it off, sewed a pillow and pad (well dez mostly did the pad) to match some other things in the room. can’t wait to show you the whole room!

voila!! what do you think of my repurposed crib? great for a little reading seat?

Categories
craft play things to do

Upcycling #1 and Pranks

two things we’ve had a lot of fun with lately are upcycling (because i don’t like wasting) and harmless pranks! i have some fun step by step upcycling posts to share later, but for now i have some small finished projects that i did to redo a wall in our living room.

my grandma gave me a whole box of old cameras, lenses and filters etc. i had them sitting in a box for the longest time not knowing what to do with them. we did a little redecorating and wanted to do movie/camera/film sort of theme. so this is what i did with some of the lenses and filters:

and a few flashes – i wish i didn’t have to use so much glue but i couldn’t figure out how to keep them in there. they are also in an old crayon box i picked up from an antique store 🙂

and this one is a bit more personal. my grandparents had all of their 8mm home movies in a box stored away for decades. i can’t remember why i had them, but we finally digitized them and ended up with all the boxes which i couldn’t throw away. they are just so cool looking! so i made a little collage of them. the fun part about them is that we’ll be able to show our kids what our grandparents had to do in order to see their home movies!

and we also put a little montage of outdated maps together. these are all cities we’ve been to:

now for the prank. it all started when we were watching gentlemen broncos with our friends over at zelo photography. they made a time capsule and blew on a friendship stone…well it’s kind of a weird movie and you just have to watch it. aaaaanyway…so since we live about 2 miles away from each other we talked about giving each other keys so we can watch each others’ houses when we’re out of town.

so this is how they gave us our key:

we were laughing so hard, especially when we opened it and found the key on top of the friendship stone 🙂

so, we had to come up with something just as good for giving them our key. my grandma also gives me things that aren’t so useful sometimes, like these ‘old’ cameras from the 90’s. i did save them just in case and then when we were at a flea market, i thought of it!!

a camera with antlers! random i know, but i think it turned out pretty cool.

and her’s the finished product and we put the key in the film slot 🙂
and, since they happened to be out of town when we finished it, we thought it would be fun to play a little prank and sprinkle their place with army men. unfortunately i couldn’t find any army men so cowboys and indians it was 🙂

i think it fits in really well on their entry table!

oh and these picture frames below were empty so we filled them too.

now i’m really in the pranking mood, and trying to think of who and what will be next!
 
Categories
craft things to do

Project Rocking Chair

my parents went through their attic and found some fun stuff that had been forgotten over the years. one item was my dad’s grandma’s rocking chair. he asked if i wanted it and i was excited to get it home and refurbish it! this was my first time refurbishing anything and i had no idea what i was doing [thanks internet].

i just LOVE this stained floral print, don’t you?

luckily the only part that needed upholstery was the pad, and it was removable!

i actually thought it would be easy enough to work on this in my living room so we could watch tv together while i took this thing apart. turns out, it was incredibly dirty inside, whoops!

all the nails and staples were rusted and pretty difficult to get out. once i got them all out i noticed that the top layer of material had just been placed over the original leather upholstery. the leather was completely thrashed underneath, and it was like an onion taking this thing apart, more and more layers! underneath the leather was hay used as the padding. again, should have done this outside!

all the garbage after ripping this thing apart…

i honestly didn’t expect that this would be all that was left after stripping it down.


this is the chair without the pad and that’s the material i picked out.

already looking much much better

and done! well for now anyway. still trying to decide if i should repaint the chair, thoughts??